Kitchen layouts.
Seven options. One clear guide.
The layout is the most permanent decision in a kitchen project. Worktops, handles, and colours are all replaceable. The position of the sink, the direction of traffic through the room, and the relationship between the cooking zone and the dining space are not. Getting the layout right before the appliances, finishes, or door style are considered protects every decision that follows.
This guide covers the seven main kitchen layouts used in UK homes: single wall, galley, L-shape, U-shape, island, peninsula, and G-shape. Each section covers the strengths and limits of the layout, the clearances and measurements you need to work with, and how a German kitchen system performs in that configuration. It also covers the working triangle, work zone planning, and UK clearance standards.
German kitchen carcasses are built to a modular height grid and offer carcass heights from 260mm to 900mm with plinths from 20mm to 200mm. The standard UK combination is a 780mm carcass with a 100mm plinth. This precision in the vertical dimension, combined with deep full-extension drawers, means German systems often deliver more storage from the same floor area than UK flat-pack equivalents. The layout choice and the carcass system are independent decisions. Any layout works with any carcass. But the combination of a good layout and a well-specified German carcass produces a different result in daily use to the same layout with a lower-specification system. See the Why German Kitchens guide for the full carcass specification detail.
The working triangle.
The working triangle links the three primary work centres: fridge, sink, and hob. In a well-planned kitchen, the distance between these three points is short enough to avoid unnecessary movement with heavy pans and hot trays, but not so short that two cooks crowd each other. The principle dates from the 1940s but remains a useful starting point for most single-cook UK kitchens.
The practical rules are straightforward. Each leg of the triangle should sit between approximately 1.2m and 2.7m. The total distance across all three legs should fall between roughly 4m and 8m. No major walkway or traffic route should cut through the triangle during normal cooking.
In compact rooms, the triangle often compresses into a straight run. This is a single-wall or galley layout in practice. In larger rooms, zone planning often gives a more useful result than the triangle because the kitchen serves multiple users and purposes simultaneously. Both approaches are valid. The triangle gives a useful reference point even where zones replace it as the primary planning method.
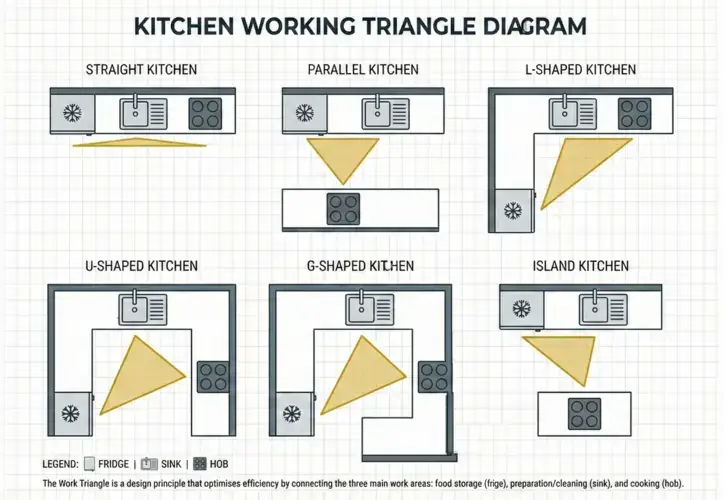
The working triangle. Each leg between 1.2m and 2.7m. Total 4–8m. No main walkway through the triangle during cooking.
- Each leg approximately 1.2m to 2.7m
- Total all three legs: 4m to 8m
- No main walkway through the triangle
- Shorter journeys with heavy pans and hot trays
- Lower risk of collision when someone passes behind
- Clear focus area for the main cook
Work zones
for modern living.
Modern UK kitchens often serve cooking, homework, home working, and entertaining in the same space. Zone planning suits this better than the classic triangle because it accounts for multiple users and activities running simultaneously rather than a single cook following a linear preparation route.
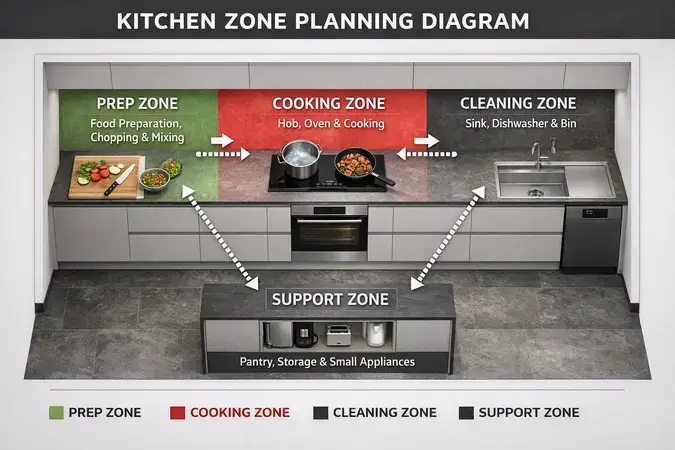
Zone planning divides the kitchen by activity rather than by the triangle between three appliances. Core zones handle cooking. Support zones handle secondary activities.
- Preparation zone near the fridge and food storage
- Cooking zone around the hob and ovens
- Cleaning zone around the sink and dishwasher
- Breakfast or coffee run near fridge, kettle, and toaster
- Small appliance zone to keep the main worktop clear
- Snack or drinks zone for guests near seating, away from the hob
- Deep full-extension drawers support each zone: pans, plates, dry goods, prep tools
- Height grid aligns drawer lines and tall storage near key zones
- Handleless runs suit open-plan rooms where the kitchen sits alongside living space
UK clearances
and key measurements.
These figures give a realistic planning baseline for UK kitchen projects. Use them before committing to a layout. Check appliance manuals for specific clearance requirements. Consult a gas-safe engineer before finalising hob and extraction positions.
- Walkway between two runs of units: 900mm minimum. 1000–1200mm feels significantly more comfortable in daily use.
- Space around an island on working sides: 1000–1200mm clear. 900mm absolute minimum. Less than this creates door-clash risk and restricts movement.
- Base carcass depth: 555–705mm depending on the manufacturer. Finished worktop depth typically 600–620mm with overhang.
- Wall unit height above worktop: 500mm minimum. Most designs sit between 500mm and 580mm, depending on splashback and lighting positions.
- Hob to extractor clearance: follow the appliance manual. Typical minimums are 750mm above gas and 500mm above induction, but these vary significantly by model.
- Appliance door clearance: avoid placing base unit drawers or tall unit doors directly opposite open oven and dishwasher doors in narrow rooms.
- Island seating: allow 600mm width per stool. 250–300mm worktop overhang for knees. 900–1100mm clear behind stools for people passing.
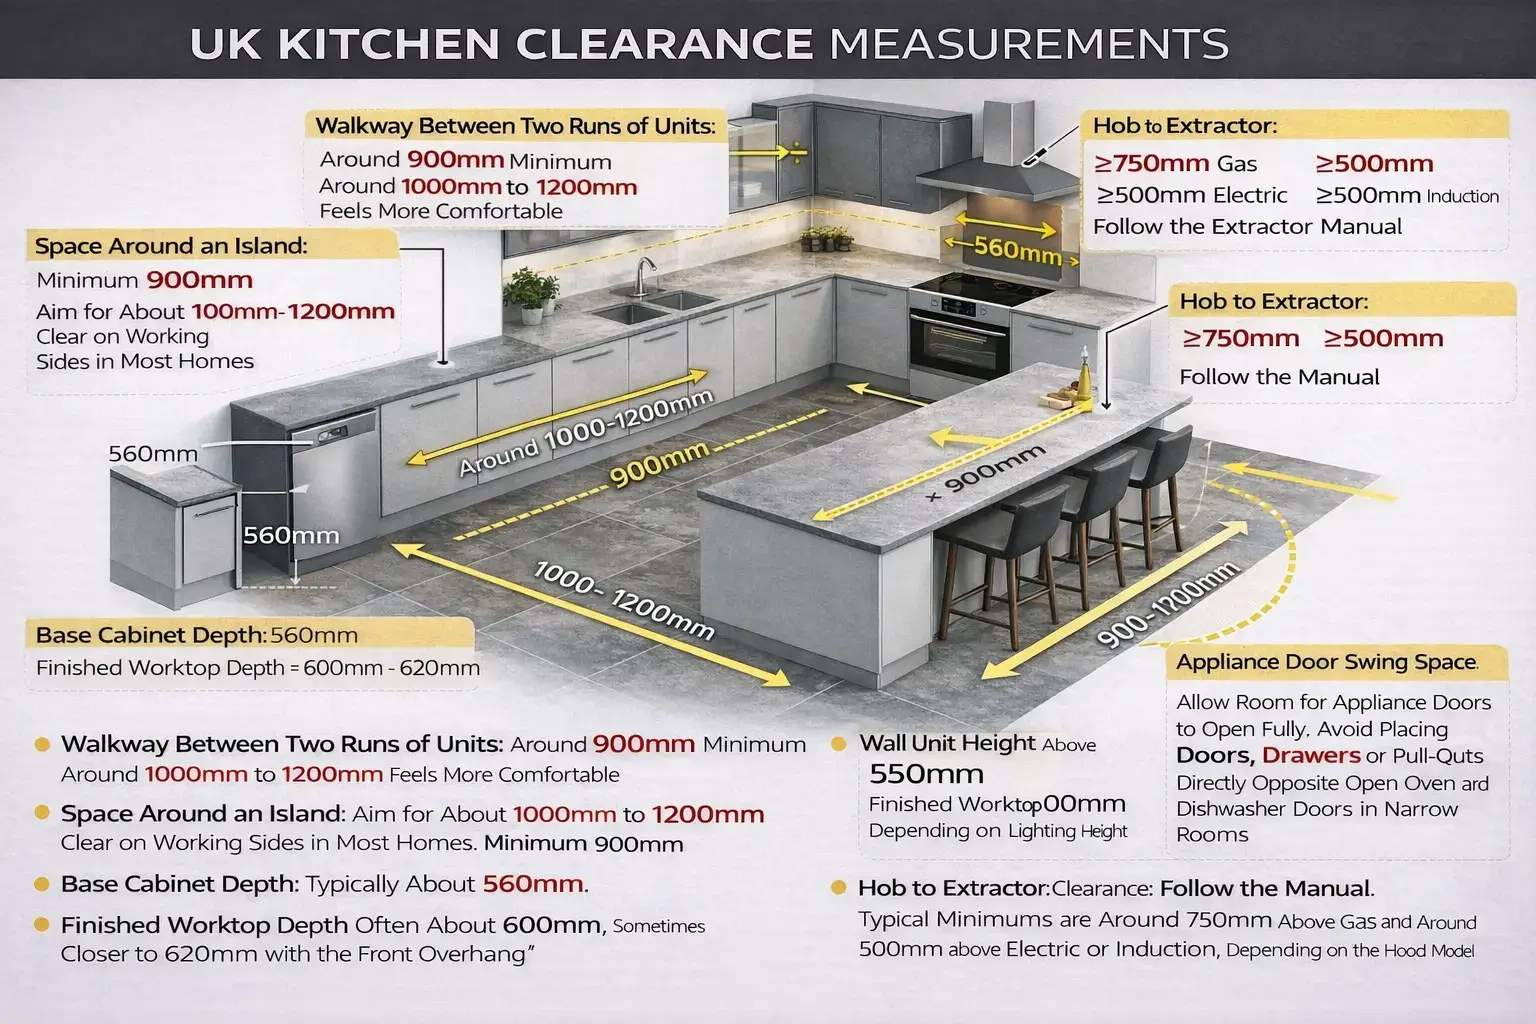
UK clearance measurements for kitchen layout planning. These are planning baselines. Appliance manuals and gas engineer guidance take precedence for specific appliance positions.
Check your appliance manuals before finalising the layout. Manufacturers specify minimum clearances for their products. A hob or extraction unit that does not meet its manufacturer's clearance specification may create a safety issue and will almost certainly affect performance. These figures are a planning baseline, not a substitute for appliance-specific guidance.
German carcass heights
and why they matter.
Many UK kitchens use approximately 720mm high base carcasses with a 150mm plinth. German kitchen ranges offer carcass heights from 260mm to 900mm and plinths from 20mm to 200mm. The standard UK combination in the German kitchen market is a 780mm carcass with a 100mm plinth.
This matters for layout planning because the final working surface height is the sum of three numbers: carcass height, plus plinth height, plus worktop thickness. A 780mm carcass with a 100mm plinth and a 38mm laminate worktop produces a 918mm working surface. Confirm this calculation on the section drawing before the order is placed.
Taller carcasses deliver more usable internal drawer depth without extending the kitchen footprint. In compact layouts where the floor area is fixed, choosing a taller carcass is one of the most effective storage gains available without redesigning the plan. A 900mm carcass on the same plan as a 780mm carcass gives the same floor footprint with meaningfully more internal storage volume per unit.
For the full carcass specification, board thicknesses, plinth options, and panel sizes, see the Why German Kitchens guide.
Carcass height + plinth + worktop = working surface height. UK standard: 780mm + 100mm + 38mm = 918mm. Confirm on the section drawing before ordering.
- More internal drawer height without extending the footprint
- Grid-based planning aligns drawer lines across the run
- Lower plinths give a more furniture-like, modern appearance
- Extra internal height supports a deeper top drawer or an additional shallow drawer
- More drawer space in compact layouts without adding run length
- A 20mm plinth creates a floating-base visual effect on islands and long runs
Single wall kitchen.
A single wall kitchen keeps all units, appliances, and services on one run. This suits narrow rooms, studios, and open-plan spaces where the kitchen sits along one wall of a larger room. It is the simplest layout to plan and the lowest in furniture cost for a given width.
The main design challenge is storage. Without a second run of units, storage relies on tall units and wall units on the one available wall. German carcass systems help significantly here because taller carcasses deliver more drawer depth from a short run, and full-height larder units make the most of vertical space that a standard UK carcass wastes.
A compact peninsula opposite the single wall run extends the layout with minimal floor area. This adds prep space, a seating option, and a visual anchor for the kitchen within the larger room without requiring the full clearances of a galley or U-shape.
- Lowest furniture and worktop cost for a given width
- Suits small rooms and secondary kitchens well
- Easy to combine with a dining table or compact peninsula opposite
- No natural triangle. Movement runs in a straight line.
- Storage relies heavily on tall units and wall units
- Two cooks on the same run feel tight
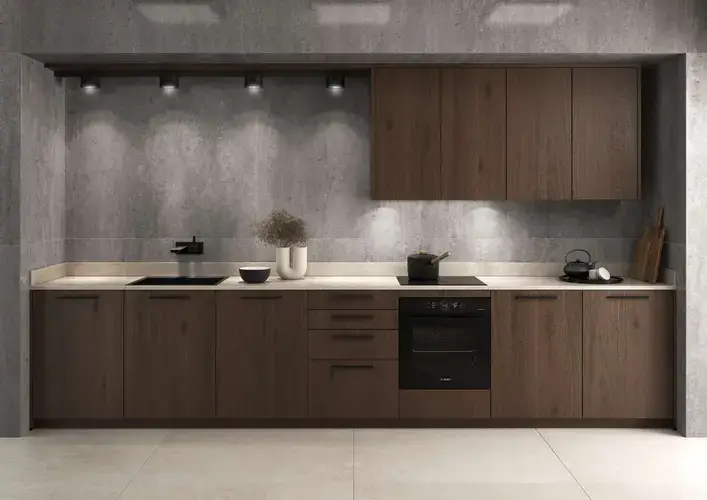
Single wall layout. All units on one run. A peninsula or dining table opposite adds prep space and a visual anchor without requiring full galley clearances.
Taller carcasses particularly suit this layout. More storage from a short run, delivered through deeper drawers and full-height larder units, compensates for the absence of a second base run. Specify the tallest carcass height the room allows before adding width to the run.
Galley kitchen.
A galley uses two runs of units facing each other. In UK housing this layout appears in older terraces, narrow extensions, and purpose-built apartments where the kitchen sits in a dedicated narrow room. It is efficient for one main cook and supports a compact working triangle between the two runs.
The critical dimension is the clear walkway between the two facing runs once units, worktops, and handles are in place. A 900mm walkway works but feels tight with two people in the kitchen. 1000–1200mm is significantly more comfortable and worth achieving through careful appliance selection and unit depth choices where the room is borderline.
Through traffic is the main practical problem in a galley layout. If the room is a corridor route to another part of the house, cooking is regularly interrupted and the risk of knocks and collisions is higher. A galley that is closed at one end and has a single entry performs substantially better than one with through traffic.
- Efficient for one main cook with short routes between work centres
- Supports a compact triangle between the two runs
- Good worktop length relative to floor footprint
- Walkway needs 900–1200mm to work. Below 900mm is difficult.
- Through traffic interrupts cooking and raises collision risk
- Two cooks feel tight unless the room width is generous
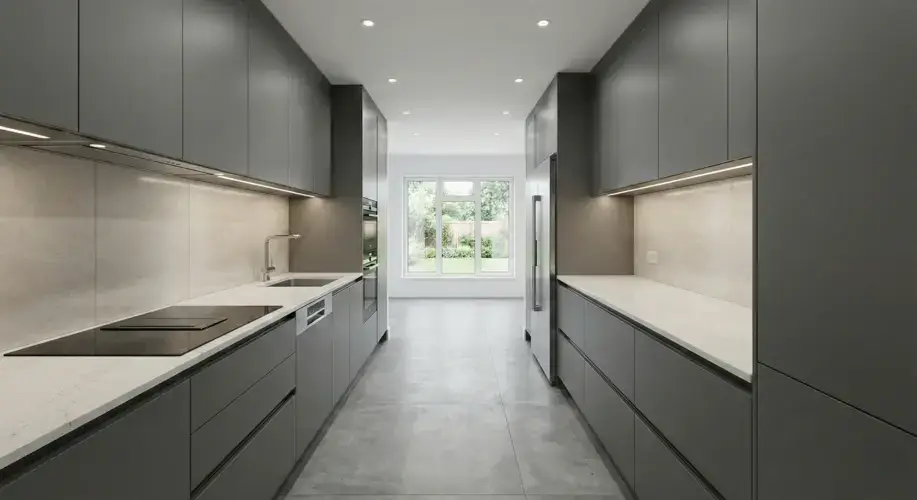
Galley layout. Two facing runs with a walkway between them. Closed at one end performs better than a through-route. Tall banks at one end for ovens, fridge, and pantry.
Check widths carefully before committing to a galley. If the clear walkway drops below approximately 900mm once unit depths, worktop overhangs, and handles are accounted for, a single wall layout with a shallow peninsula often gives a better daily result than a very tight galley.
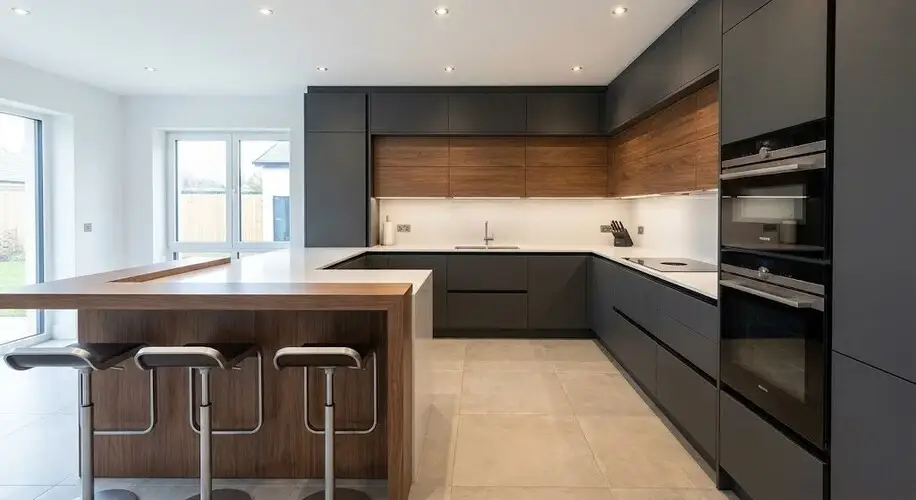
L-shaped kitchen.
The L-shape uses two adjoining walls and leaves two sides of the room open. It is the most common kitchen layout in UK semi-detached and detached homes and works well in extensions and open-plan knock-throughs where the kitchen connects to a dining or living area.
Units run along one main wall and turn the corner to a second wall. The hob typically sits on the longer run with the sink on the shorter return, or the other way around depending on the window and service positions. The open corner of the room accommodates a table, an island, or a clear circulation route to the garden or dining area.
The internal corner where the two runs meet needs careful planning. Poor corner storage wastes a significant volume of the most valuable cabinet space in the kitchen. Carousel systems, magic corners, and Le Mans pull-out solutions all address this problem. German manufacturers offer dedicated corner solutions within their system grids that are worth specifying at the design stage rather than treating the corner as a planning afterthought.
- Open feel with space for a table or island opposite
- Supports both triangle and zone planning
- Works well in extensions and open-plan knock-throughs
- Corner space needs a clear access solution or it becomes dead storage
- Fridge placement needs thought so food storage and prep sit close together
- A short return limits tall storage on the secondary wall
L-shaped layout. Two adjoining walls, two open sides. Specify the corner solution at design stage. Grid-aligned drawer runs on the main wall deliver the cleanest storage result.
Specify the corner solution before anything else on an L-shape. The position and type of the corner unit determines the dimensions of every other unit in both runs. A Le Mans pull-out or magic corner unit has different space requirements to a standard carousel. Confirm the corner type on the plan before the rest of the layout is drawn.
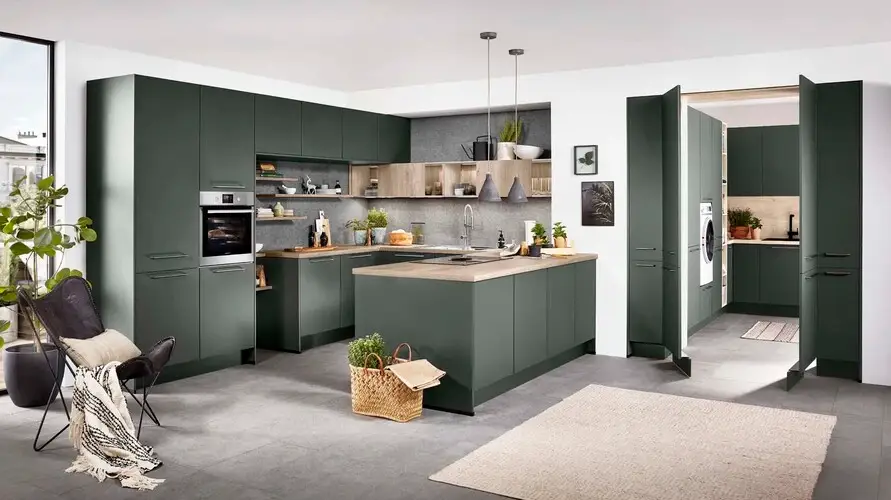
U-shaped kitchen.
A U-shape uses three walls of the room. It delivers the largest worktop area and the highest storage volume of any layout within a fixed floor plan. The working triangle sits naturally within the three runs, with short routes between all three work centres. It suits medium to larger kitchen rooms and works particularly well in a dedicated kitchen room rather than an open-plan space.
The two internal corners need the same careful planning as the L-shape, but there are twice as many of them. Both corners need a specified access solution at design stage. Two poorly planned corners waste a significant proportion of the available cabinet volume and make the layout frustrating in daily use regardless of how well the rest of the plan is executed.
In narrow U-shapes where the clear floor area between the three runs is tight, tall units on every wall risk making the room feel enclosed. The most common solution is to use lower units or open shelves on one wall, typically the wall opposite the main cooking run, and reserve tall storage for the two side walls where it does not interrupt the sightline across the room.
- Maximum worktop area on three walls
- Working triangle sits naturally between fridge, sink, and hob
- Short routes for the main cook throughout the space
- Two corners both need proper access planning
- Narrow U-shapes feel enclosed if clear floor space is too limited
- Tall units on all three walls risk a boxed-in appearance
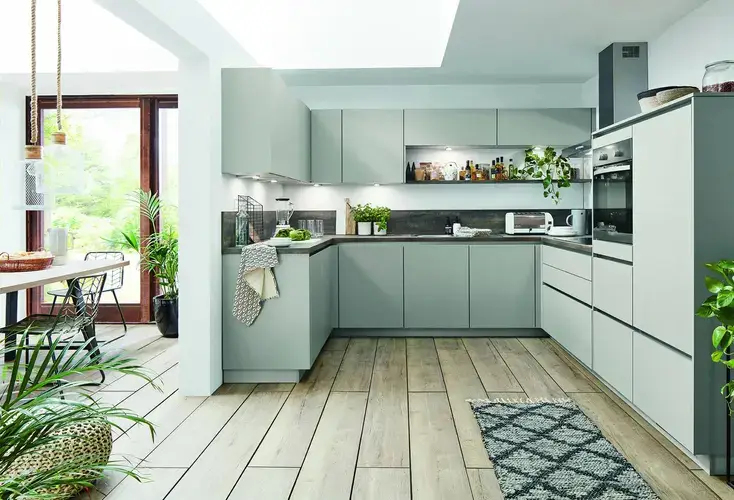
U-shaped layout. Three walls. Best worktop area of any layout. Specify both corner solutions before drawing the rest of the plan. Tall storage on one wall maximum keeps the room from feeling enclosed.
Specify both corner solutions before the rest of the plan is drawn. As with the L-shape, corner unit type determines the dimensions of every adjacent unit in both runs that connect to it. Finalising both corners first prevents the rest of the U from needing to be redrawn once corner dimensions are confirmed.
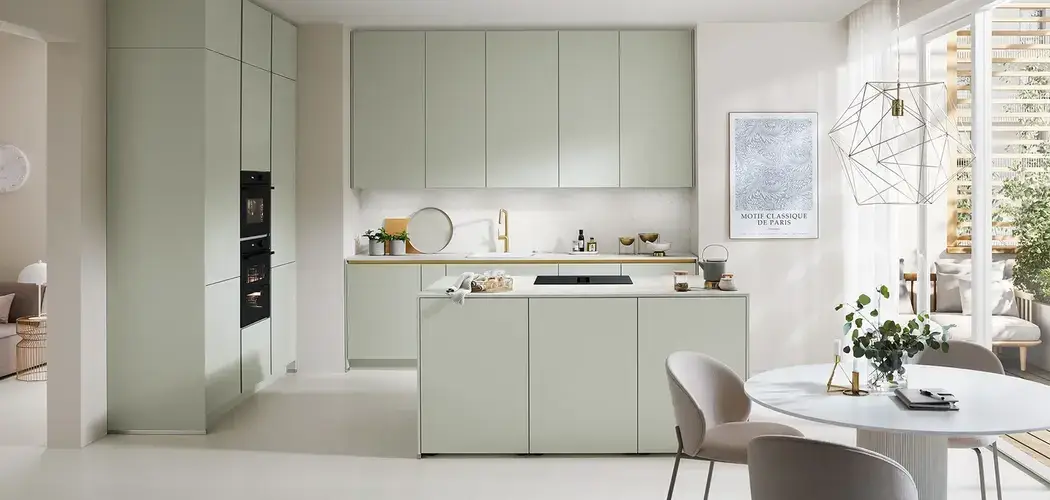
Island kitchen.
An island layout adds a freestanding unit in the centre of the kitchen. It suits open-plan extensions and larger rooms where the kitchen connects to dining and living areas. The island is the focal point of the room and determines most of the other planning decisions around it.
The island role varies by project. It commonly holds preparation worktop, seating with a breakfast bar or lower counter, storage in the form of drawers and cabinets on the dining side, and occasionally a hob with downdraft extraction or an integrated extractor ceiling above it. A sink in the island is possible but requires plumbing in the floor, which adds cost and constraints on island positioning.
Clearance is the dimension that most limits island sizing in UK homes. 1000–1200mm of clear walkway on the working sides of the island is the comfortable range for one person. 900mm is the absolute minimum. A kitchen room that looks generous enough for an island on a plan often turns out to have compromised clearances when unit depths, worktop overhangs, and door swings are all drawn in at full size. Confirm clearances on the full-size elevation drawing before the order is placed.
- Social hub facing into the room rather than the wall
- Supports clear separate zones on different sides
- Strong focal point for handleless designs and horizontal lines
- 1000–1200mm clear on working sides. 900mm absolute minimum.
- Services for a sink or hob in the island require plumbing or electrical in the floor
- Small gaps raise door-clash risk and slow movement significantly
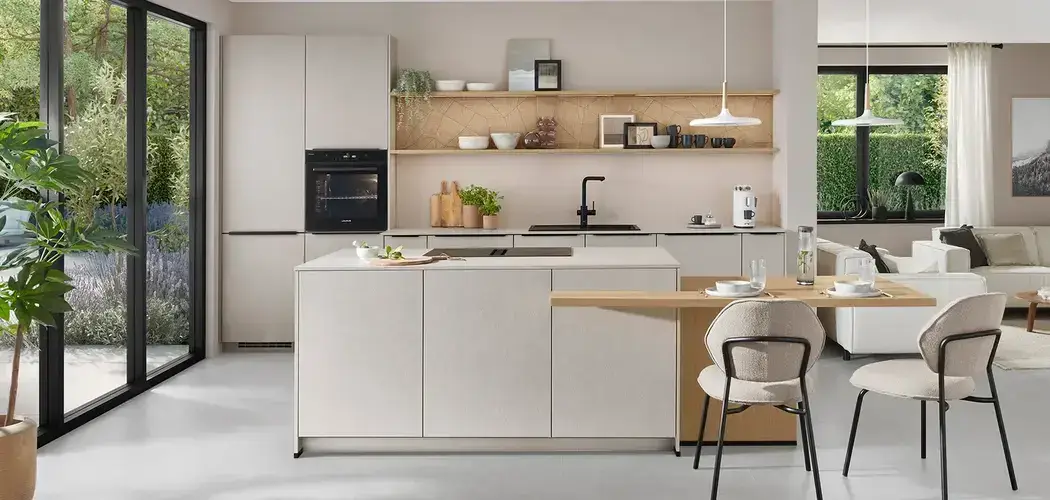
Island layout. Clearance is the critical dimension. Confirm 1000–1200mm on all working sides on the full-size drawing before ordering. Taller carcasses on the back wall with a lower island plinth give the most balanced appearance.
Draw the island at full size before committing. The most common island planning mistake in UK homes is underestimating the space an island takes from the walkways once carcass depth, worktop overhang, and door swings are included. A 1000mm wide island on a plan takes more than 1000mm of floor space in a real room. Draw the clearances first and work backward to the island size, not the other way around.
Peninsula and G-shaped
kitchen layouts.
Peninsula layout. A peninsula runs out from a wall or tall bank and stays attached at the back. It suits L-shaped and U-shaped kitchens that need more prep space or seating without the clearance requirements of a full island. The peninsula connects to the main run on one end, which means only two sides and the end need clearance rather than all four sides.
The peninsula creates a natural division between the kitchen and dining area, which works well in open-plan UK homes where the kitchen connects to a living space. A breakfast bar on the dining side of the peninsula is a standard use in family homes. The limitation is that the peninsula creates a single main entry point into the cooking area. If the cooking run is behind the peninsula and the entry is at one end, traffic in and out of the kitchen all passes through the same point.
G-shaped layout. A G-shape starts with a U-shape and adds a short extra return that creates a partial fourth side. It suits larger rooms where high storage and worktop levels are the priority and the cook prefers a defined, contained working area. The G-shape is the most storage-intensive kitchen layout available for a given room size. The risk is visual heaviness if every wall uses tall units, and tight openings if the extra return is not positioned carefully.
Peninsula layout. Attached run extends from the wall run. Natural room divider. One main entry to the cooking area.
G-shaped layout. U-shape plus a short additional return. Maximum storage. Plan lighting and the opening position carefully to avoid a heavy or enclosed feel.
- Island character with less clearance demand
- Strong natural room divider between kitchen and dining
- Good breakfast bar position for family homes
- Risk of visual heaviness if tall units appear on all walls
- Opening position and lighting need careful planning
- Best suited to larger rooms and serious home cooks
Does your layout suit
a German kitchen system?
Any layout works with a German kitchen system. The carcass specification, drawer quality, and hardware certification are independent of the layout choice. The question is not which layout suits German kitchens, but rather where the specific advantages of a German system make a measurable difference to the result.
- Single wall and galley kitchens where storage needs to work hard on short runs. Taller German carcasses with deep full-extension drawers deliver meaningfully more storage from a limited floor length than UK flat-pack equivalents.
- L, U, and G-shapes where consistent alignment and clean drawer lines matter. The German height grid keeps every door front and drawer line aligned across the full run, even where levels change.
- Island and peninsula layouts in open-plan spaces where handleless or Shaker fronts link the kitchen furniture to the surrounding room. The precision of German carcass construction is particularly visible on a freestanding island viewed from a dining or living area.
- Period cottages and listed homes where in-frame or traditional doors fit the architecture and a bespoke British joiner's approach suits the brief better than a German modular system.
- Projects built around freestanding furniture pieces rather than fully fitted runs, where the kitchen is a collection of individual pieces rather than a system.
- Very tight budgets where a simple UK flat-pack range keeps more money available for building work, appliances, or worktops, and the kitchen specification is not the primary investment in the project.
If you want clean lines, deep drawers, and grid-based planning, a German kitchen system tends to improve daily use across most layouts in this guide. The carcass quality, drawer load ratings, and hardware certification produce a measurable difference in how the kitchen feels after ten years compared to a lower-specification system in the same layout. See the Why German Kitchens guide for the full specification comparison.
Quick layout comparison.
Use this table to narrow your options before moving to drawings and quotes. Each layout is summarised by the room type it suits, its main strengths, and its primary limitations.
| Layout | Best room type | Main strengths | Main limitations |
|---|---|---|---|
| Single wall | Very small rooms or open-plan spaces where the kitchen sits along one wall | Lowest cost for a given width. Easy to place dining or a peninsula opposite. | Linear movement only. Storage relies on tall units and wall units. |
| Galley | Narrow rooms, older terraces, and dedicated kitchen rooms | Efficient for one cook. Strong triangle between the two runs. Good worktop length. | Walkway needs 900–1200mm. Through traffic interrupts cooking. |
| L-shape | Small to medium rooms, extensions, open-plan knock-throughs | Open feel. Flexible zone planning. Extends naturally with a table or island. | Corner access needs a specified solution. A short return limits tall storage. |
| U-shape | Medium to large rooms, dedicated kitchen rooms | Maximum worktop area. Short routes for the main cook. Natural triangle. | Two corners both need planning. Narrow rooms feel enclosed. Tall units on all walls risk a boxed look. |
| Island | Larger rooms and open-plan extensions | Social hub facing the room. Strong zones. Visual focal point. | Requires 1000–1200mm clearance. Services in the island raise floor work cost. |
| Peninsula | Medium rooms where an island character is wanted with less clearance | Natural room divider. Good breakfast bar position. Island feel without full circulation. | Creates one main entry into the cooking area. Return length and fridge position need care. |
| G-shape | Larger enclosed kitchens, serious home cooks | Highest storage and worktop levels of any layout. Strong cooking focus. | Visual heaviness risk. Opening position and lighting need planning. Suits larger rooms only. |
Decision checklist.
- What is the tightest clear distance between walls once standard units are in place?
- Where do doors and windows sit, and which ones remain fixed in position?
- Is there a direct route from the kitchen to the garden or dining space that needs to stay clear?
- Where will extraction ducting run, and what is the shortest route to outside?
- Are there floor services (gas, water, drainage) that constrain appliance positions?
- How many people cook at the same time on most evenings?
- Do you host often and want guests near the island or peninsula, or prefer the cooking area separate?
- Do you value storage more than open floor area, or the other way round?
- Would a modern grid-based kitchen suit the rest of the house, or does the property suit a more traditional approach?
- Is the kitchen the primary investment in this project, or does the budget prioritise building work, appliances, or worktops?
Next steps for your layout and kitchen style.
Measure the room, mark doors and windows, then sketch one or two realistic layouts from this guide. Check clearances and triangle or zone logic against the figures in Section Three. Once a layout feels right, compare German and non-German options and decide which carcass height, system, and door style fit your plans.
A German kitchen suits the brief when you want modern lines, strong drawer storage, and precise grid-based planning. A different route suits better when the property calls for a traditional approach, or when the budget prioritises building work and appliances over the furniture specification. Choose the layout and the kitchen style you will enjoy using every day for the next fifteen to twenty years.